Thursday, August 22, 2013

Nail Care Essentials

Hi!
I think it's safe to say that most of us want healthy, and pretty nails but there are a bunch of products out there and it's easy to get overwhelmed, that's why today I bring you my list of nail care essentials.
This is just what I think every person that wants healthy nails should have, also, they're easy to find and are super helpful.

  • Orange Sticks: Pushing back your cuticles every one-two weeks helps with nail growth and there´s nothing better to do it with than orange sticks, also they're really cheap and you cand find them at almost any nail supply store.
  • Crystal Nail File: I know I say this a lot but a good nail file goes a long way, also, quick reminder: NEVER cut your nails, file them down.Also never file them while wet
  • Nail Hardener: I keep repeating myself but everytime you paint your nails, you should also use a hardener, it helps keep your nails strong.
  • Cuticle Oil: Like I've said in previous posts, healthy cuticles=healthy nails, just rub some on after painting your nails and every morning and night and your hands will look fancy.
  • Base Coat and Top Coat: You can use your nail hardener as a base coat but it doesn´t hurt to own ana ctual base coat, also, a top coat is a really handy thing to have if you wear polish regularly, it helps smooth out the polish and protects it from chipping too fast. My favorite is China Glaze Fast Forward because it also dries quickly, I've heard really good things of the Seche Vite one but I avoid products with toluene so I wouldn´t recommend.
And remember, you nails aren't tools!

That's it for this post! I hope you find it helpful! What are your nail essentials? Let me know in a comment!

Wednesday, August 21, 2013

Orly Nail Lacquer Thinner: Review

Hey! How's everyone doing? I've been good, really cold though!
I'm pretty sure most of you have gotten the "Why do you want more than one polish? It's gonna go bad" speech. Since I'm a polish hoarder, everytime someone sees my collection they say that to me.
Most of us know the old "fix it with acetone" trick, but I found out the hard way that it only works for a day or so, because the acetone evaporates and your polish goes back to the old consistency. After looking for something to fix my polishes with, because I refused to lose them, I found this Orly Nail Lacquer Thinner, and there were great reviews of it everywhere, and I always liked Orly polishes so I thought, why not.
 

After going to Sally Beauty Supply and buying it, a surprise since all the Sallys where I live have absolutely nothing, I thought I'd try it with a not so important polish to see if ot actually worked.
According to the instructions, you have to put 2 drops on the polish and it magically fixes it.
I tried it with an old top coat that was practically unusable, I used 2 drops and nothing, 5 drops still nothing, I had to use 20 drops or so before it started working.
                               
Honestly I thought that maybe it was made to only work on Orly polishes, and I used it on my absolute favorite polish that was going bad, Orly Naughty, exactly the same thing happened.

Veredict: It does work but it takes 20 drops, not 1-2. There´s still quite a lot left on the bottle so I'm gonna finish it but I'm not gonna repurchase, maybe next time I'll give Beauty Secrets a try.

Have you thrown away a loved polish because of this? Leave a comment and let me know!

Monday, August 12, 2013

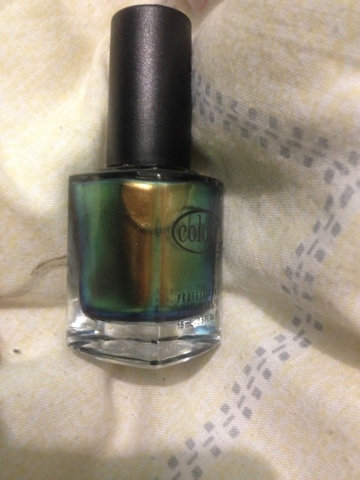
Color Club Editorial: Swatch and Review

Hey everyone! How are you today!
Today I bring you the promised swatch of Color Club Editorial.
This is a green and gold duochrome.
So I started with a hardener and nail armor, then I applied two coats of Editorial, the formula was really easy to work with although it looks a bit streaky but pretty.
The effect is really strong in the sunlight, it does show on the shade but not as strong.
The photos below are indoors (because it's raining like crazy) with 2 coats and no top coat.


I got this polish at Sally Beauty Supply.
That's it for this post, I hope you are having a great day! Leave a comment to let me know what you think!

Wednesday, August 7, 2013

Mini Haul

Today I bring you another mini haul!
So like I told you in a previous post, I have been going to Sally Beauty Supply quite a lot lately but I manage to control myself and not buy anything but this time I just couldn't. Also at the mall I was in, there was a furniture store, my country's equivalent of Ikea.

So first, I know I said my favorite dye is Manic  Panic but I've been curious about Ion and I've been thinking about dying my hair white, then orange and since they were cheaper I got them, also the cruelty free thing convinced me.
 Inside the box there's a 2.05 oz/58.2g and instructions.I'll let you know what I think when I finally use them.

 I also got a nail polish, I know, but I just couldn't resist just look at it.
It's Editorial by Color Club, I'll have the swatch up by  Saturday or Monday so be sure to check it out!
Then I went to Idea, yeah that's the name of the store, and I got three mini almondvanilla  candles and a blue candle holder, let me tell you, I'm not a big fan of candles but they smell so awesome I got them, also the big one is guava/coconut and while I was already getting candles I thought "why not?"


I haven't used the large one yet but the little ones smell so good! 
I hope you enjoyed the post and have an awesome day! 
What would you like to see next? Any polish swatches? Let me know in a comment!

Tuesday, August 6, 2013

Nail Growing Tips: How to stop peeling and breakage.

Hey how's everyone doing? Here it's being raining like crazy and no sun, my favorite weather so I've been in a good mood.
Today's post is a helpful guide on how to stop your nails from peeling and breaking! For a long time I had problems with this and I couldn't grow my nails past a certain point because they started to peel really badly and were really weak but now my nails grow really long without peeling, and they only break when I'm dumb and break them with the trunk of the car haha. 
I found that following these easy steps help a bunch so here they are:

•NEVER cut your nails, always file them down.

•Use a crystal nail file and only file in ONE direction, if you file back and forward tour nails can split and hello peels.
These files are so helpful and they last a long time, just be careful not to drop it because it can break.You can get them at Sephora or Sally Beauty Supply.

•Push your cuticles back, dip them in warm soapy water for 5 minutes and push them back with an orange stick, never cut them. Heathy cuticles = healthy nails.

•Use a nail hardener, if you have long nails put it in both sides of the nail. Use as a base coat or under the base coat. My favorite is Beauty Secrets hardener, you can get it at Sally Beauty Supply.

•Always keep your cuticles hydrated, dip them in warm olive oil once a week and  put cuticle oil every morning and every night.

•If you change your nail color often let your nails breath and rest from polish at least 2 days every 2 weeks or so.

So, follow this easy steps and you'll be on your way to healthy hard nails!
Please follow and leave a comment if you have any question, comment or just about anything!
I hope you have an awesome day!


Sunday, August 4, 2013

Nail Art: Textured Polish


Hello! How are you today?
Today I bring you some nail art featuring my super small nails!
So I've seen that not everyone likes textured polish, personally, I really like it and I think it can look pretty great if you just use it to make some details.
Before anything, let me tell you that after I took these pictures I realized that my nails looks like those circles on the cheeks of crash test dummies but that's just because the polish looks black but it's not!

So I started with a base coat, lately I've been doing a coat of Beauty Secrets Hardener and then one coat if Orly Nail Armor.
Then I applied two coats of China Glaze Happy Go Lucky and one coat of China Glaze Fast Forward, I used the top coat now because I can't put it at the end because it will ruin the texture of the other polish plus I wanted the yellow to be smooth 

Then I put tape on my nails and painted a triangle alternating between top and side.I used OPI What Wizardry Is This? from the Wizard of Oz collection. It actually is more gold in person but for some reason it looks black in pictures. It's also a textured polish but it doesn't look like it.

As you can see I painted my fingers because I'm a mess, also my index nail looks like pac man.
Now wait for them to dry and put tape forming a triangle on the opposite side if the previous triangle.
 
Paint over it and ta da! We're done!
Don't use a top coat unless you want the texture gone, that's why I used it before the textured polish. I also used some cuticle oil after finishing.

So that's it for this post but leave mr a comment! Do you like textured polish? Let me know!