Monday, October 7, 2013

Vegan Lavender Cookies

Hey! How are you?
Lately I've been obsessed with lavender, I bought some of it dried and wow it's really amazing and I've been trying it on everything and that's why today I bring you a recipe for vegan lavender cookies.
This makes a ton of cookies, I don't know exactly how many, sorry. I got the lavender at a local organic store.
You'll need:
  • 3 packs of Stevia.
  • The equivaent of 2 eggs, using the replacement of your choice.
  • 2 cups of flour.
  • 1/4 cup of soy milk, I used vanilla.
  • 4 tablespoons of agave nectar.
  • 1 teaspoon of baking powder.
  • 1/4 teaspoon of baking soda.
  • 1/4 teaspoon of salt.
  • 3 tablespoons of dried lavander.
  • 1 teaspoon of vanilla extract.
  • 1 teaspoon of nutmeg.
  • 1/4 cup of canola oil. 
Here's everything I used except the milk because I forgot.

As the egg replacer I used:
  •  2 teaspoons of baking powder.
  • 2 tablespoons of oil.
  • 1 tablespoon sof oil
 That replaces 1 egg, so I doubled everything and put it in a little bowl, mixed and put it aside.


In a large bowl mix the oil, agave nectar, and stevia.


Add the egg replacement and mix.
In a bowl add all the reamining dry ingredients and mix being careful not to spill anything.


Then sift the dry mixture over your liquid mixture.


Then add the milk and mix. It should look like this.


Now chop the lavender as small as you can. And add it in.


Mix it and you should have a sticky dough.
Now, I meant to take photos of the next steps but it was just too messy because I was working the dough with my hands.
So, next form a ball with the dough, wrap it in plastic and put it in the freezer overnight if you can. I was too impatient and put it in the freezer for 2 hours.
Pre-heat the oven at 190 C/375 F Then put some flour in a cutting board, place the dough and roll it. I used some heart cookie cutters that I had laying around but you can do any shape you want. This dough was enough to fill two trays.
Bake for 8 minutes and then turn the oven off, leave for another minute and take them out. They might look saggy and soft but once they cool off they will harden.
                      

I thought my little cousins weren't gonna like them because they weren't chocolate but they loved them and fought for the last one! So for me, that was a success.
I really hoped you liked the recipe! If you make them let me know in a comment! 

Saturday, October 5, 2013

Beauty Secrets Non-Acetone Nail Polish Remover: Review

Hi everyone!
First of all let me just say IM SO SO SORRY for not posting in so long, but my computer was broken and the mobile app absolutely hates me and I couldn't do anything about it, but now my computer is working (let's hope it continues working) and I have some reviews and recipes lined up! So stay tuned for that.

But today I have a review of the Beauty Secres Non-Acetone Nail Polish Remover.

The reason I bought this was because I was at Sally Beauty Supply and I remembered I ran out of my nail polish remover so I saw this, it was good value for money and it said Non-Acetone so I thought "well it can't be that bad" so I got it. When I got home I opened it and was quite surprised with the smell, it doesn't smell as bad as others do, so my sister asked me to try it on her and boy was that a mistake.
It took forever to remove the polish from one nail and it left her nail peeling and hurting, it was awful, and this was just regular polish, no glitter, no nothing. Then I though "well maybe it's because my sister is allergic to everything" so I tried it on my nails, and that was a huge mistake, The only nail I tried it on hurt like hell and was peeling like crazy, it was a huge mess so I don't recommend this. I even tried to use it to clean my nails art brushes and it was useless.

If you read the bottle it says "gentle professional formula" and "safe for natural or artificial nails". This is not gentle or safe for natural nails, it may smell like blackberries but that's about it. So I'm gonna stick with my drugstore brand or Essence because those may be a little bit more expensive but they don't damage my nails.
What do you think? Have you tried this nail polish remover? Let me know in a comment! Thanks for reading!


Tuesday, September 10, 2013

An Eyebrow Pencil You Have To Try.

Hello! How are you? I know it looks like I've been away for long but my computer was broken and the app decided to put a different date on everything I posted so I've been avoiding using it, but let's stay on topic.
I've always thought thtat filling in your eyebrows can make a HUGE difference if you do it right.
Before I started filling in my eyebrows on a regular basis, I tried to do it on many different ocassions but everytime was the same, terribly dark eyebrows that made me look awful no matter what product I used until I came across this.
Essence Eyebrow Designer in Blonde.

Now, my hair is a dark blonde but my eyebrows look darker, and when I had to pick the shade I almost bought the brown one (I forgot the exact name sorry) but I thought, better lighter than ending up with super dark eyebrows again. It also comes with a little brush on the lid so you can tame your eyebrows after filling them in.

After trying this, I realized that the color was just perfect, it looks natural, not too light and not too dark. I was able to make this look good even when I suck and had zero experience with eyebrows so it's the perfect product even if you're just looking to experiment. The product doesn't fade easily and it's also cheap.
I think that whats makes this an awesome product is the fact that even if you press kind of hard it doesn't leave an obscene amount of product, it looks really light so if you want a more dramatic look you might have to pass the pencil several times, and even then it lasts a really long time. The photo below is the swatch, I pressed the pencil hard against my hand so you could get a good look of the shade.


Overall I really like Essence, I've loved every product of them I've tried so far and my favorite thing is that they don't test on animals.
I hope you liked this post and that you got inspired to start doing your eyebrows if you aren't already,I swear it makes the biggest difference. If you have any doubts, thoughts, suggestions about future post or just about anything please leave a comment and I'll get back to you!

Thursday, August 22, 2013

Nail Care Essentials

Hi!
I think it's safe to say that most of us want healthy, and pretty nails but there are a bunch of products out there and it's easy to get overwhelmed, that's why today I bring you my list of nail care essentials.
This is just what I think every person that wants healthy nails should have, also, they're easy to find and are super helpful.

  • Orange Sticks: Pushing back your cuticles every one-two weeks helps with nail growth and there´s nothing better to do it with than orange sticks, also they're really cheap and you cand find them at almost any nail supply store.
  • Crystal Nail File: I know I say this a lot but a good nail file goes a long way, also, quick reminder: NEVER cut your nails, file them down.Also never file them while wet
  • Nail Hardener: I keep repeating myself but everytime you paint your nails, you should also use a hardener, it helps keep your nails strong.
  • Cuticle Oil: Like I've said in previous posts, healthy cuticles=healthy nails, just rub some on after painting your nails and every morning and night and your hands will look fancy.
  • Base Coat and Top Coat: You can use your nail hardener as a base coat but it doesn´t hurt to own ana ctual base coat, also, a top coat is a really handy thing to have if you wear polish regularly, it helps smooth out the polish and protects it from chipping too fast. My favorite is China Glaze Fast Forward because it also dries quickly, I've heard really good things of the Seche Vite one but I avoid products with toluene so I wouldn´t recommend.
And remember, you nails aren't tools!

That's it for this post! I hope you find it helpful! What are your nail essentials? Let me know in a comment!

Wednesday, August 21, 2013

Orly Nail Lacquer Thinner: Review

Hey! How's everyone doing? I've been good, really cold though!
I'm pretty sure most of you have gotten the "Why do you want more than one polish? It's gonna go bad" speech. Since I'm a polish hoarder, everytime someone sees my collection they say that to me.
Most of us know the old "fix it with acetone" trick, but I found out the hard way that it only works for a day or so, because the acetone evaporates and your polish goes back to the old consistency. After looking for something to fix my polishes with, because I refused to lose them, I found this Orly Nail Lacquer Thinner, and there were great reviews of it everywhere, and I always liked Orly polishes so I thought, why not.
 

After going to Sally Beauty Supply and buying it, a surprise since all the Sallys where I live have absolutely nothing, I thought I'd try it with a not so important polish to see if ot actually worked.
According to the instructions, you have to put 2 drops on the polish and it magically fixes it.
I tried it with an old top coat that was practically unusable, I used 2 drops and nothing, 5 drops still nothing, I had to use 20 drops or so before it started working.
                               
Honestly I thought that maybe it was made to only work on Orly polishes, and I used it on my absolute favorite polish that was going bad, Orly Naughty, exactly the same thing happened.

Veredict: It does work but it takes 20 drops, not 1-2. There´s still quite a lot left on the bottle so I'm gonna finish it but I'm not gonna repurchase, maybe next time I'll give Beauty Secrets a try.

Have you thrown away a loved polish because of this? Leave a comment and let me know!

Monday, August 12, 2013

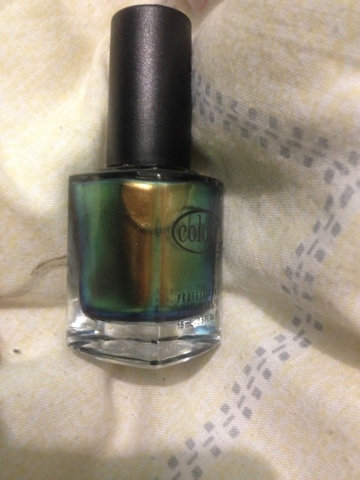
Color Club Editorial: Swatch and Review

Hey everyone! How are you today!
Today I bring you the promised swatch of Color Club Editorial.
This is a green and gold duochrome.
So I started with a hardener and nail armor, then I applied two coats of Editorial, the formula was really easy to work with although it looks a bit streaky but pretty.
The effect is really strong in the sunlight, it does show on the shade but not as strong.
The photos below are indoors (because it's raining like crazy) with 2 coats and no top coat.


I got this polish at Sally Beauty Supply.
That's it for this post, I hope you are having a great day! Leave a comment to let me know what you think!

Wednesday, August 7, 2013

Mini Haul

Today I bring you another mini haul!
So like I told you in a previous post, I have been going to Sally Beauty Supply quite a lot lately but I manage to control myself and not buy anything but this time I just couldn't. Also at the mall I was in, there was a furniture store, my country's equivalent of Ikea.

So first, I know I said my favorite dye is Manic  Panic but I've been curious about Ion and I've been thinking about dying my hair white, then orange and since they were cheaper I got them, also the cruelty free thing convinced me.
 Inside the box there's a 2.05 oz/58.2g and instructions.I'll let you know what I think when I finally use them.

 I also got a nail polish, I know, but I just couldn't resist just look at it.
It's Editorial by Color Club, I'll have the swatch up by  Saturday or Monday so be sure to check it out!
Then I went to Idea, yeah that's the name of the store, and I got three mini almondvanilla  candles and a blue candle holder, let me tell you, I'm not a big fan of candles but they smell so awesome I got them, also the big one is guava/coconut and while I was already getting candles I thought "why not?"


I haven't used the large one yet but the little ones smell so good! 
I hope you enjoyed the post and have an awesome day! 
What would you like to see next? Any polish swatches? Let me know in a comment!